Friday, December 31, 2010

Make iPhone Ring Tone

Instructions
Things You'll Need:

* iTunes
* Mac or Windows computer
* Non-DRM song (i.e., one not bought from the iTunes Store)
  • Open iTunes.
  • Find the song that you want to make into a ringtone.
  • Listen to the song and find the part of it you want to use. The chorus may be a good place to start.
  • Write down the start and stop times of the clip.
  • Right-click the song and select "Get Info."
  • Click the "Options" tab.
  • Type in the start time of your ringtone in the text box next to "Start Time" in the minutes:seconds (i.e., 2:01) format.
  • Type in the end time of your ringtone in the text box next to "Stop Time." Make sure the ringtone is no more than 40 seconds long.
  • Click "OK."
  • Right-click your song again and select "Convert Selection to AAC." Wait for iTunes to convert your song. It will create a duplicate version.
  • Right-click the ringtone and select "Delete."
  • Click on the "Keep Files" button.
  • Find the file. It's usually in your User folder under "Music > iTunes > iTunes Music" and under the band's name. It will have an extension of m4a.
  • Replace the m4a extension of your ringtone with m4r. You can either double-click slowly to rename your file, or right-click and select "Get Info" on a Mac or "Rename" on a Windows PC.
  • Click "Use .m4r" or the PC equivalent when the system warns you that the change may affect the use of your file.
  • Double-click the ringtone file. ITunes will automatically add it to your ringtones folder in your iTunes Music Library.
  • Connect your iPhone and sync your ringtones.
Read more: How to Make Custom iPhone Ringtones for Free | eHow.com http://www.ehow.com/how_2160460_custom-iphone-ringtones-free.html#ixzz19h2oWX97

Monday, October 18, 2010

Windows 2008 - Configure the Shutdown Event Tracker

Configure the Shutdown Event Tracker


  1. Click Start, Run, and then enter gpedit.msc. Click OK.
  2. The Group Policy Object Editor console opens.
  3. In the left pane, expand Computer Configuration, and then Administrative Templates.
  4. Click System
  5. In the right pane, find and double-click the Display Shutdown Event Tracker.
  6. When the Display Shutdown Event Tracker Properties dialog box opens, select one of the following options:
    • Not Configured
    • Enabled
    • Disabled

  7. If you select the Enabled option, you can choose between the
    following options to specify when the Shutdown Event Tracker should be
    displayed:
    • Always: This option is self explanatory.
    • Server Only: When selected, the Shutdown Event Tracker is displayed for only Windows Server 2003/2008 servers.
    • Workstation Only: When selected, the Shutdown Event Tracker is displayed for only Windows XP Professional workstations.

  8. If you want to view help information on the Shutdown Event Tracker application, click the Explain tab.
  9. Click OK, and then close the Group Policy Object Editor console.

Friday, October 15, 2010

Recovering Deleted Items in Active Directory

As you probably read in my previous articles – "Recovering Deleted Items in Active Directory" and "Restore Windows Server 2003 Active Directory", an administrator might sometime need to restore deleted objects from the Active Directory database. You see, when an object is deleted from Active Directory, it is not immediately erased, but is marked for future deletion. The marker used to designate that an AD object scheduled to be destroyed is called "tombstone". A tombstone is an object whose IsDeleted property has be set to True, and it indicates that the object has been deleted but not removed from the directory, much like a deleted file is removed from the file allocation table but the data is not actually removed from the drive. The directory service moves tombstoned objects to the Deleted Objects container, where they remain until the garbage collection process removes the objects. The length of time tombstoned objects remain in the directory service before being deleted is either 60 days for Windows 2000/2003 Active Directory, or 180 days for Windows Server 2003 SP1 Active Directory (by default).

Manually Undeleting Objects in Active Directory

Your Windows Infrastructure Will Want This Nifty Tool!

Wouldn't you love it if you could automatically discover and restart an FTP service before even 30 seconds of it being down?

OpManager through over 500 built-in monitors, event log rules, SNMP traps and remote troubleshooting tools, gives admins a tight grip over Windows server performance, including even MS Exchange, SQL and Active Directory.

Monitor 10 Servers for Free! Download a 30-day Trial Here »

There are several methods of reanimating tombstoned objects from the Active Directory. Some are listed on my "Recovering Deleted Items in Active Directory" article. Another method is to manually recover these items, a process called "Reanimation".

To manually undelete objects in a deleted object's container, follow these steps:

1. Click Start, click Run, and then type LDP.exe.

Note: If the LDP.exe utility is not installed, install the support tools from the Windows Server 2003 installation CD, or get them from Windows 2003 SP1 Support Tools.

2. Use the Connection menu in LDP to perform the connect operations and the bind operations to a Windows Server 2003 domain controller. Specify domain administrator credentials during the bind operation.

3. Click Options > Controls.

4. In the Load Predefined list, click Return Deleted Objects. Under Control Type, click Server, and the click OK.

5. Click View > Tree. Now type the distinguished name path of the deleted objects container in the domain where the deletion occurred, and then click OK.

Note: The distinguished name path is also known as the DN path. For example, if the deletion occurred in the petri.local domain, the DN path would be the following path:

cn=deleted Objects,dc=petri,dc=local

6. In the left pane of the window, double click the Deleted Object Container.

Note: As a search result of LDAP query, only 1000 objects are returned by default. For example, if more than 1000 objects exist in the Deleted Objects container, not all objects appear in this container. If your target object does not appear, use NTDSUTIL, and then set the maximum number by using maxpagesize to get the search results, as described in the following KB article: How to view and set LDAP policy in Active Directory by using Ntdsutil.exe - 315071 7. Double-click the object that you want to undelete or to reanimate.

8. Right-click the object that you want to reanimate, and then click Modify.

9. Next, change the value for the isDeleted attribute and the DN path in a single Lightweight Directory Access Protocol (LDAP) modify operation.

To configure the Modify dialog, follow these steps:

a. In the Edit Entry Attribute box, type isDeleted. Leave the Value box blank.

b. Click the DELETE option button, and then click Enter to make the first of two entries in the Entry List dialog.

Important: Do not click Run at this phase!!!

c. In the Attribute box, type distinguishedName. In the Values box, type the new DN path of the reanimated object. For example, to reanimate the TestUser user account to the Sales OU, use the following DN path:

cn=TestUser,ou=Sales,dc=petri,dc=local

Note: If you want to reanimate a deleted object to its original container, append the value of the deleted object's lastKnownParent attribute to its CN value, and then paste the full DN path in the Values box.

d. In the Operation box, click REPLACE. Click ENTER.

e. Click to select the Synchronous check box, and the Extended check box.

f. Click RUN. Note the results pane on the right side showing you that the operation was successful.

10. After you reanimate the objects, click Options > Controls and click the Check Out button to remove (1.2.840.113556.1.4.417) from the Active Controls box list.

11. Open Active Directory Users and Computers, and reset the user account passwords, profiles, home directories and group memberships for the deleted users. You need to do this because when the object was deleted, all the attribute values except SID, ObjectGUID, LastKnownParent and SAMAccountName were stripped.

12. Enable the reanimated account in Active Directory Users and Computers.

Note: The restored object has the same primary SID as it had before the deletion, but the object must be added again to the same security groups to have the same level of access to resources. The RTM release of Windows Server 2003 does not preserve the sIDHistory attribute on reanimated user accounts, computer accounts, and security groups, however, Windows Server 2003 with Service Pack 1 does preserve the sIDHistory attribute on deleted objects.

13. If you do not reset the reanimated user account's password you will get an error saying:

Windows cannot enable object TestUser because:

Unable to update the password. The value provided for the new password does not meet the length, complexity, or history requirement of the domain.

For organizations using Exchange 2003 you need to remove Microsoft Exchange attributes and reconnect the user to the Exchange mailbox.

In order to do so follow these steps:

  1. In Active Directory Users and Computers, right-click the restored user and select Exchange Tasks.
  2. Select Remove Exchange Attributes and click Ok all the way till the end of the wizard.

  1. In Exchange System Manager, navigate to the mailbox store containing the recovered user's mailbox. Refresh the Mailboxes node list, and if needed, right-click the Mailboxes node and select Run Cleanup Agent.

Note that the deleted user's mailbox is marked with a red X.

  1. Right-click the deleted mailbox, select Reconnect.

  1. Type the reanimated user's name. Press Check Names, then click Ok.

  1. The mailbox is now reconnected. Wait a couple of minutes or re-run the Recipient Update Service from the Exchange System Manager console.

You can automate some or all of these recovery steps by using the following methods:

  • Write a script that automates the manual recovery steps.
  • Obtain a non-Microsoft program that supports the reanimation of deleted objects on Windows Server 2003 domain controllers. Read my "Recovering Deleted Items in Active Directory" article for more info on that.

Friday, August 27, 2010

Clipboard not working in Windows XP

"Many users often complain to their system adminstrator that their clipboard is not working and they are unable to do copy/paste operations and it is the task of sys admins to break their head to find out the reason. Dear sysadmin...no more you need to do that. I came across a good tool which can help you to solve this problem.

This problem generally occurs when a process locks clipboard for reading and writting and didn't release it properly. Clipboard will function normally after killing that process. The tool (GetOpenClipboardWindow) will help you to identify the culprit process. Download this tool now and share it with users.

From my experience, I can say that mostly mstsc.exe is the process which blocks the clipboard. The reason I assume here is simple because it dealts with clipboard of connected computer and your computer."

Found: Here
Technorati Tags: , , , ,

Monday, August 16, 2010

Saturday, July 17, 2010

Keep Flash open Full Screen on 2nd Monitor

Windows: With hardware-accelerated Flash 10.1 final now available, it's a good time to try out some full-screen Hulu or other videos. But click anywhere else, and the window-filling frame goes away. Here's how to keep videos playing full screen using Flash 10.1.

We've previously pointed to a fullscreen Flash fix, but the post that covered the fix offered up specific file-copy fixes for particular Flash builds. Now that Flash has updated to 10.1 final, and is changing rapidly due to security fixes, a more general sense of how to change Flash's behavior so it doesn't close down on clicking elsewhere is called for.

Luckily, Andrew Brampton provides the answer. His fix requires doing some hacking in a particular configuration file: NPSWF32.dll for most Windows systems, but gcswf32.dll for Chrome users. And it requires using a hex editor to pin down a particular string and change two values.

How do you pull that off? First off, download the free XVI32 hex editor. Once you have it installed, hunt down the file you need to edit, make a copy of it, then drag another copy to the Desktop. Brampton provides the locations:

On win32 open
C:\Windows\System32\Macromed\Flash\NPSWF32.dll

On win64 open
C:\Windows\SysWOW64\Macromed\Flash\NPSWF32.dll

or if using Google Chrome (as Chrome now comes with the Flash plugin) open
C:\Users\Andrew\AppData\Local\Google\Chrome\Application\6.0.408.1\gcswf32.dll

Keep Flash 10.1 in Full Screen on a Second  MonitorNow right-click on the .dll file, select "Open With," tell Windows you'll "Select from a list" to open it, then point to the XVI32 executable contained in the package you downloaded. As Brampton explains, the exact two-character code you'll need to change will differ between Flash versions, but there's a basic string you can search for. As of the latest version of Flash for Chrome (10.1.53.64), you'll hit the Search menu and select Find (or hit Ctrl+F), then search for this string of hex bytes:

74 39 83 E8 07 74 11 83 E8 05 75 13 8B

The 74 and 75 "bytes" will likely always stay the same, and some of the characters between them, but other nearby bytes may change. Your job is to change the first two bytes in that string ("74 39" in this case) to "90 90". Before you try to save your changes, make sure that you've got a backup copy of the original, and then close down all your browser windows before saving, or you'll encounter a "sharing" error of some sort. If you have successfully saved your changes, copy the file back to its original location, then re-launch your browser.

As noted, these specifics will change—the Flash version, and the exact byte string you're searching for. Using Brampton's guide, though, you should be able to update your Flash builds whenever you lose the ability to catch the worthwhile bits from Saturday Night Live while, um, totally working really hard on a Friday.

Via: Lifehacker

Friday, July 16, 2010

Windows 7 Shares (Not Resolved)

Try this 1st:
Rightclick on the Drive you want to share.
Go to properties->Sharing->Advanced Sharing
Under permissions make sure you add the user AND the group "Authenticated userss" and give both full permissions.

There you go, now you can share your drives and you do NOT have to chose "Everybody" =)

-------
If not working then go here:

click the start button and type secpol.msc in the search function.

Browse to "Local Policies" -> "Security Options". Now look for the entry "Network Security: LAN Manager authentication level" and open it. Click on the dropdown menu and select "Send LM & NTLM - use NTLMv2 session security if negotiated". Apply the settings.

In the Advanced sharing settings page of Network and sharing center, you need to have it set as Work/Home profile. Try

-Enable network discovery
-Turn on file and print sharing
-Turn off password protected sharing
-Use user accounts and passwords to connect to other computers

The other settings such as encryption I have set as use 128 bit encryption.

Please check related policies.

1. Enter “gpedit.msc” in the Start Search box.
2. Open “Computer Configuration”/Windows Settings/Security Settings/Local Policies/Security Settings.
3. In the right pane, enable the following policies:

Network access: Allow anonymous SID/name translation
Network access: Let Everyone permissions apply to anonymous users

Also please disable the following policies.

Network access: Restrict anonymous access to Named Pipes and Shares
Network access: Do not allow anonymous enumeration of SAM accounts
Network access: Do not allow anonymous enumeration of SAM accounts and shares

Tuesday, July 13, 2010

VMware Extend Disk


There comes a time when the size of your VM disk isnt enough for your purposes. Here is how extend the partition.

In the VM Settings locate the HD on the right side select Expand.

Set the size of the HD you would like to expand it to and click Expand.

Now I have been toying with the next part quite a bit. Within the VM you can create a new HD and use it as secondary space. If you would perefer to extend the primary partition then grab a copy of Gparted.

VMware likes to starts its host operation system pretty fast so we will need to edit the settings:
(Wordpad worked for me)
Close the VM and open the vmx-file in an editor.
Add this line
bios.bootDelay = "5000"
save file and start the VM.

Mount the CD or ISO to boot from. Select your CD drive and load Gparted. GP is a pretty simple program to use so follow the menus once you have it loaded.

Good luck!

Wednesday, July 7, 2010

RDP Dual Monitors

Ive been trying to figure out how to use RDP while having a two monitor setup. Finally I found the trick.

To have the remote computer's desktop span two monitors, simply type 'mstsc /span' at a command prompt (i.e. Start, Run, cmd.exe, mstsc /span). This feature is sometimes called continuous resolution. To toggle in and out of full-screen spanned mode, press Ctrl+Alt+Break.


Source: Remote Desktop Dual Monitor Support tip

Wednesday, April 21, 2010

Server Management run line strartups

AD Domains and Trusts
domain.msc

Active Directory Management
admgmt.msc

AD Sites and Serrvices
dssite.msc

AD Users and COmputers
dsa.msc

Computer Management
compmgmt.msc

Friday, March 26, 2010

AD Scripting user creation

Script to use:


Dsadd user "cn=%1, ou=OUName, dc=YourDomain, dc=YourSuffix" -fn%2 =ln%3 -pwd password -mustchpwd yes


Excel Google Doc

Save Spread sheet as Formatted Text (Space Delimited)

Change .prn file to .bat after saved


Move to C:\ then run command from their.


Enjoy.

Friday, March 12, 2010

To set up Google Sync on your iPhone or iPod Touch device, please follow the steps below.

Requirements and Upload

1. Google Sync is only supported on iPhone OS versions 3.0 and above. You can check your current version by going to Settings > General > About > Version. To upgrade, follow the instructions at http://www.apple.com/iphone/softwareupdate/. Please upgrade to iPhone OS 3.0 before setting up Google Sync.

2. Perform a sync with iTunes to ensure that Contacts and Calendars from your iPhone are backed up to your computer. Learn more about backing up your Contacts and Calendars.

3. If your business, school, or organization uses Google Apps, your administrator will first need to enable Google Sync before you can take advantage of this feature.

Getting Started

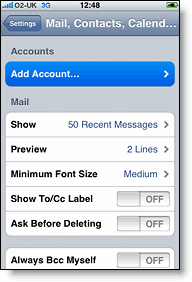
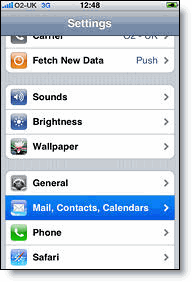
1. Open the Settings application on your device's home screen.
2. Open Mail, Contacts, Calendars.
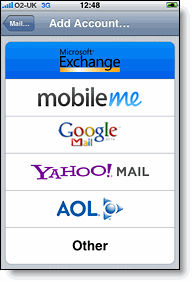
3. Tap Add Account....
4. Select Microsoft Exchange.

settings mail calendar contacts on iphone add mail calendar contacts account on iphone microsoft exchange

Enter Account Info

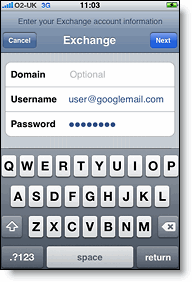
5. In the Email field, enter your full Google Account email address. If you use an @googlemail.com address, you may see an "Unable to verify certificate" warning when you proceed to the next step.
6. Leave the Domain field blank.
7. Enter your full Google Account email address as the Username.
8. Enter your Google Account password as the Password.
9. Tap Next at the top of your screen.
9a. Choose Cancel if the Unable to Verify Certificate dialog appears.
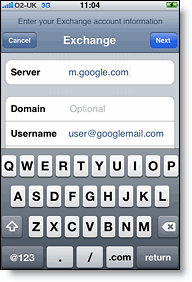
10. When the new Server field appears, enter m.google.com.
11. Press Next at the top of your screen again.

exchange domain exchange server

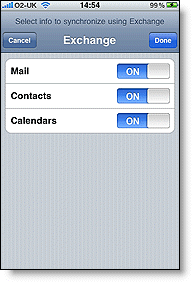
12. Select the Google services (Mail, Calendar, and Contacts) you want to sync.

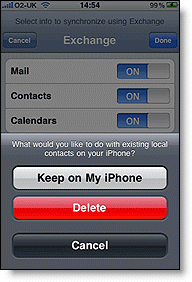
13. Unless you want to delete all the existing Contacts and Calendars on your phone, select the Keep on my iPhone option when prompted. This will also allow you to keep syncing with your computer via iTunes.

If you want to sync only the My Contacts group, you must choose to Delete Existing Contacts during the Google Sync install when prompted. If you choose to keep existing contacts, it will sync the contents of the "All Contacts" group instead.

iphone exchange mail calendars contacts exchange keep on my iphone

You've set up Google Sync for your iPhone. Synchronization will begin automatically if you have Push enabled on your phone. You can also open the Mail, Calendar or Contacts app and wait a few seconds to start a sync.

Found Via: http://www.google.com/support/mobile/bin/answer.py?hl=en&answer=138740

Tuesday, March 9, 2010

Watch A Man Start A Game On a PC, Continue On Windows 7 Phone, Finish on Xbox 360

Microsoft's "Live Anywhere" concept, whereby Xbox Live can be shared across multiple platforms, isn't quite yet with us. But when it is, it may look something like this. More »

--
Andrew...

Monday, March 8, 2010

FlashHacker Keeps Flash Videos in Full Screen on Your Dual Monitors

Windows: If you've got more than one monitor, you've probably tried fullscreening a Flash video on one monitor while working in another. The problem: Flash exits fullscreen as soon as you click on something. FlashHacker fixes this problem.

A few months ago we highlighted a somewhat complicated method of tweaking Flash to fix this problem, but it hasn't been updated for a while and doesn't work with Flash 10 (the latest version of Flash). FlashHacker, on the other hand, should work like a charm on all versions of Flash. Just fire it up and click the big Hack My Flash! button. (Blogger Mike Pegg reports that he had to first click unhack and then hack, so if it's not working the first time, you may want to try that.)

FlashHacker is a free download for Windows only. Any Mac or Linux users figure out how to address this issue? Let's hear about it in the comments. Thanks badgerz!


--
Andrew...

AutoPatcher - Keep your Windows 7 Systems Patched


Windows: AutoPatcher, the small but powerful utility that makes it easy to install Windows updates while offline, and on multiple systems, has added support for Windows 7, giving users more control over when and how they update their systems.

We've previously offered big props for AutoPatcher, because for people with slow connections, big jobs to pull off, or quite a few systems to keep updated, it's far more convenient than going the official Microsoft Updates route. To use this version, you'll download the package, run "apup," then let AutoPatcher build its own program from the most recent updates. Once that's done, run AutoPatcher from your initial downloaded folder, and tell it which updates you want to download and, optionally, install. Because it's a portable application, those updates you grab can be brought to any other Windows 7 system, and you can grab updates for XP, Vista, and other editions as well.

AutoPatcher is a free download for Windows systems only.


--
Andrew...

Sunday, March 7, 2010

Turn off FireFox Compatibility Check

Hate the annoying firefox compatibility check? Here's how to turn it off.

1. In the Firefox address bar type “about:config”
2. By-pass the warning screen (Anything worthwhile is a little dangerous!)
3. Right click in the list of settings, choose New > Boolean
4. Type the phrase “extensions.checkCompatibility” and press enter
5. Choose “false” as the value
6. Restart Firefox

Now all of your “incompatible” add-ons should be working.

Wednesday, February 17, 2010

Launch AD from run window

If your logging in to a server that doesnt have MMC setup you can enter:

mmc dsa.msc

To launch AD with out having to drill down through the start menu.