Friday, July 16, 2010

Windows 7 Shares (Not Resolved)

Try this 1st:
Rightclick on the Drive you want to share.
Go to properties->Sharing->Advanced Sharing
Under permissions make sure you add the user AND the group "Authenticated userss" and give both full permissions.

There you go, now you can share your drives and you do NOT have to chose "Everybody" =)

-------
If not working then go here:

click the start button and type secpol.msc in the search function.

Browse to "Local Policies" -> "Security Options". Now look for the entry "Network Security: LAN Manager authentication level" and open it. Click on the dropdown menu and select "Send LM & NTLM - use NTLMv2 session security if negotiated". Apply the settings.

In the Advanced sharing settings page of Network and sharing center, you need to have it set as Work/Home profile. Try

-Enable network discovery
-Turn on file and print sharing
-Turn off password protected sharing
-Use user accounts and passwords to connect to other computers

The other settings such as encryption I have set as use 128 bit encryption.

Please check related policies.

1. Enter “gpedit.msc” in the Start Search box.
2. Open “Computer Configuration”/Windows Settings/Security Settings/Local Policies/Security Settings.
3. In the right pane, enable the following policies:

Network access: Allow anonymous SID/name translation
Network access: Let Everyone permissions apply to anonymous users

Also please disable the following policies.

Network access: Restrict anonymous access to Named Pipes and Shares
Network access: Do not allow anonymous enumeration of SAM accounts
Network access: Do not allow anonymous enumeration of SAM accounts and shares

Tuesday, July 13, 2010

VMware Extend Disk


There comes a time when the size of your VM disk isnt enough for your purposes. Here is how extend the partition.

In the VM Settings locate the HD on the right side select Expand.

Set the size of the HD you would like to expand it to and click Expand.

Now I have been toying with the next part quite a bit. Within the VM you can create a new HD and use it as secondary space. If you would perefer to extend the primary partition then grab a copy of Gparted.

VMware likes to starts its host operation system pretty fast so we will need to edit the settings:
(Wordpad worked for me)
Close the VM and open the vmx-file in an editor.
Add this line
bios.bootDelay = "5000"
save file and start the VM.

Mount the CD or ISO to boot from. Select your CD drive and load Gparted. GP is a pretty simple program to use so follow the menus once you have it loaded.

Good luck!

Wednesday, July 7, 2010

RDP Dual Monitors

Ive been trying to figure out how to use RDP while having a two monitor setup. Finally I found the trick.

To have the remote computer's desktop span two monitors, simply type 'mstsc /span' at a command prompt (i.e. Start, Run, cmd.exe, mstsc /span). This feature is sometimes called continuous resolution. To toggle in and out of full-screen spanned mode, press Ctrl+Alt+Break.


Source: Remote Desktop Dual Monitor Support tip

Wednesday, April 21, 2010

Server Management run line strartups

AD Domains and Trusts
domain.msc

Active Directory Management
admgmt.msc

AD Sites and Serrvices
dssite.msc

AD Users and COmputers
dsa.msc

Computer Management
compmgmt.msc

Friday, March 26, 2010

AD Scripting user creation

Script to use:


Dsadd user "cn=%1, ou=OUName, dc=YourDomain, dc=YourSuffix" -fn%2 =ln%3 -pwd password -mustchpwd yes


Excel Google Doc

Save Spread sheet as Formatted Text (Space Delimited)

Change .prn file to .bat after saved


Move to C:\ then run command from their.


Enjoy.

Friday, March 12, 2010

To set up Google Sync on your iPhone or iPod Touch device, please follow the steps below.

Requirements and Upload

1. Google Sync is only supported on iPhone OS versions 3.0 and above. You can check your current version by going to Settings > General > About > Version. To upgrade, follow the instructions at http://www.apple.com/iphone/softwareupdate/. Please upgrade to iPhone OS 3.0 before setting up Google Sync.

2. Perform a sync with iTunes to ensure that Contacts and Calendars from your iPhone are backed up to your computer. Learn more about backing up your Contacts and Calendars.

3. If your business, school, or organization uses Google Apps, your administrator will first need to enable Google Sync before you can take advantage of this feature.

Getting Started

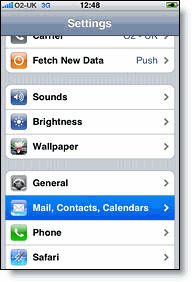
1. Open the Settings application on your device's home screen.
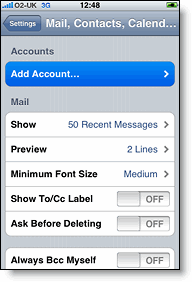
2. Open Mail, Contacts, Calendars.
3. Tap Add Account....
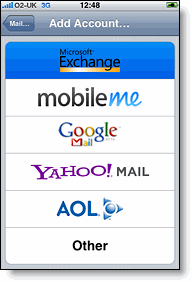
4. Select Microsoft Exchange.

settings mail calendar contacts on iphone add mail calendar contacts account on iphone microsoft exchange

Enter Account Info

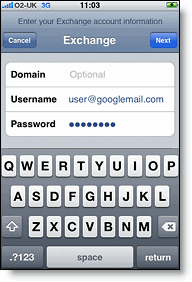
5. In the Email field, enter your full Google Account email address. If you use an @googlemail.com address, you may see an "Unable to verify certificate" warning when you proceed to the next step.
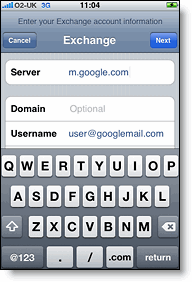
6. Leave the Domain field blank.
7. Enter your full Google Account email address as the Username.
8. Enter your Google Account password as the Password.
9. Tap Next at the top of your screen.
9a. Choose Cancel if the Unable to Verify Certificate dialog appears.
10. When the new Server field appears, enter m.google.com.
11. Press Next at the top of your screen again.

exchange domain exchange server

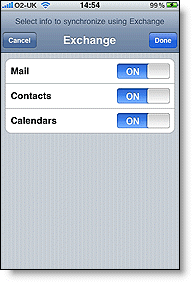
12. Select the Google services (Mail, Calendar, and Contacts) you want to sync.

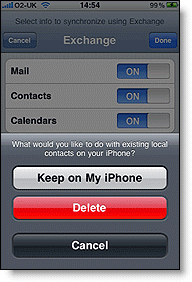
13. Unless you want to delete all the existing Contacts and Calendars on your phone, select the Keep on my iPhone option when prompted. This will also allow you to keep syncing with your computer via iTunes.

If you want to sync only the My Contacts group, you must choose to Delete Existing Contacts during the Google Sync install when prompted. If you choose to keep existing contacts, it will sync the contents of the "All Contacts" group instead.

iphone exchange mail calendars contacts exchange keep on my iphone

You've set up Google Sync for your iPhone. Synchronization will begin automatically if you have Push enabled on your phone. You can also open the Mail, Calendar or Contacts app and wait a few seconds to start a sync.

Found Via: http://www.google.com/support/mobile/bin/answer.py?hl=en&answer=138740