Desktops allows you to organize your applications on up to four virtual desktops. Read email on one, browse the web on the second, and do work in your productivity software on the third, without the clutter of the windows you’re not using. After you configure hotkeys for switching desktops, you can create and switch desktops either by clicking on the tray icon to open a desktop preview and switching window, or by using the hotkeys.
Desktops v1.0
Wednesday, December 9, 2009
Thursday, October 1, 2009
Using Shared Networking (NAT) with a Windows Server 2003 virtual machine
"Virtual PC has a convenient feature called 'Shared Networking'. What this is is a small virtual NAT (network address translation) router - which is quite similar to the cheap hardware broadband routers that a lot of people use (myself included). The advantage of Shared Networking is that your virtual machine can access the external network with needing to be directly connected to it*. This is handy if you don't want to have to worry about whether your virtual machine has all the latest security patches, or if you regularly move your physical machine between different network configurations (e.g. moving a laptop from you work network to your home network).
Normally using Shared Networking is very simple. You just enable it and set the guest operating system to use DHCP - and everything works. This is not the case with a Windows Server 2003 guest though. The problem is that Shared Networking configures the guest operating system to use the same DNS servers as are used by the physical computer. However - all DNS packets are actually returned from '192.168.131.254' - which is the virtual gateway used by Shared Networking.
Windows Server 2003 looks at the DNS packet, sees that it is coming from a source other than the DNS server it requested the information from, and rejects it. A simple fix for this is to manually assign the DNS server inside the virtual machine to 192.168.131.254 - then everything will work just fine."
Source: Blogs.msdn.com
Wednesday, September 30, 2009
Windows 7 - Border Padding
In Vista the border padding was annoying, well they brought it back in Windows 7. Here's how to edit the settings for it.

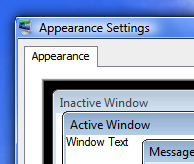
How to edit it in Vista:
right-click the Desktop.
on the pop-up right click context menu, select Personalize
then click on “Windows Color and Appearance”
click on “Open Classic Appearance Properties” for more display and color options
make sure the color scheme selected is Windows Aero, then click on the Advanced button
select “Border Padding” in the Item drop-down box
type a new size for the border to change (increase or decrease) the size of the border. Default border size is 4
click OK twice to save the changes and exit
the new visual border size for Windows Aero will display immediately
- Under Personalization
- Window Color
- Border Padding


How to edit it in Vista:
right-click the Desktop.
on the pop-up right click context menu, select Personalize
then click on “Windows Color and Appearance”
click on “Open Classic Appearance Properties” for more display and color options
make sure the color scheme selected is Windows Aero, then click on the Advanced button
select “Border Padding” in the Item drop-down box
type a new size for the border to change (increase or decrease) the size of the border. Default border size is 4
click OK twice to save the changes and exit
the new visual border size for Windows Aero will display immediately
Friday, September 25, 2009
Iphone - Audiobook converter
Converts MP3 Audiobooks to Iphone/Itunes compatible version. Provides the ability to remember the spot you left off at when listening through an ipod device.
Audiobook Software Link
Audiobook Software Link
Tuesday, September 22, 2009
How to Create a File List at a Command Prompt
How to Create a File List at a Command Prompt
1. Click Start, point to Programs, and then click MS-DOS Prompt (or Command Prompt in Windows NT).
2. At a command prompt, locate the drive that contains the folder whose contents you want to list. For example, if you want to create a text file that contains a list of the contents of a folder on drive C, type the following command at a command prompt, and then press ENTER:
c:
3. At a command prompt, locate the folder whose contents you want to list. For example, if you want to create a text file that contains a list of the contents in the Windows folder on drive C, type the following commands at a command prompt, and press ENTER after you type each command:
cd\
cd windows
4. Type the following command at a command prompt, and then press ENTER, where filename is the name of the text file that you are creating:
dir > filename.txt
For example, if you want to create a file named Windowsfolderlist.txt, type the following command at a command prompt, and then press ENTER:
dir > windowsfolderlist.txt
NOTE: The text file that you create is located in the folder that you are in when you follow these steps. In the earlier example, the Windowsfolderlist.txt file is located in the Windows folder.
5. Use a text editor, such as Notepad, to view or print this file..
MS KB Article
Thursday, June 11, 2009
Saturday, May 23, 2009
Monday, May 4, 2009
Let the World stand together...Amazing video
Playing For Change | Song Around The World "Stand By Me" from Concord Music Group on Vimeo.
Truely an amazing video!
Sunday, April 12, 2009
Wednesday, April 1, 2009
Google Calendar: Howto Import Outlook (CSV) or iCal Calendar Events
1. Open Outlook
2. Click File menu
3. Click Import and Export
4. Click Export to a file
5. Click Comma Separated Values (DOS)
6. You may be required to install the possible translator here. Just follow the directions on the screen.
7. Select folder to export from: Calendar
8. Browse, name, and save the file some place easy to find it. (Desktop)
9. Click Next
10. On the follow actions will be performed screen click the Finish button.
11. Allow the export to perform
12. Open Google Calendar
13. Click the small ‘Add’ link in the bottom right corner of the “Other calendars” box that’s on the left side of your calendar page.
14. Click the Import Calendarlink under Calendar settings
15. Click the Browse button and select your exported file
16. Choose your calendar
17. Click Import and wait. It may take a bit.
18. It’ll tell you when it’s done!!!
Saturday, March 28, 2009
Apply A Folder View To All Folders In Vista
Have you ever noticed that when you change the view for a folder, that specific view is not applied to any other folders that you open? For example, if you open a folder and switch to the Small Icons view, then open a subfolder, the same view is not applied.
If you prefer a specific view, You can have it applied to all of your folders. This means when you switch views, it will be applied regardless of which folder you open. You can accomplish this through the Folder Options dialog box.
Tuesday, March 3, 2009
How To: Change Windows XP Admin PW
Here’s a quick and easy way to change your administrator password on Windows XP.
1. Place your Windows XP CD in your cd-rom and start your computer (it’s assumed here that your XP CD is bootable – as it should be - and that you have your bios set to boot from CD)
2. Keep your eye on the screen messages for booting to your CD Typically, it will be “Press any key to boot from CD”
Hack Windows XP Admin Password
3. Once you get in, the first screen will indicate that Setup is inspecting your system and loading files.
4. When you get to the Welcome to Setup screen, press ENTER to Setup Windows now
5. The Licensing Agreement comes next - Press F8 to accept it.
6. The next screen is the Setup screen which gives you the option to do a Repair.
It should read something like “If one of the following Windows XP installations is damaged, Setup can try to repair it”
Use the up and down arrow keys to select your XP installation (if you only have one, it should already be selected) and press R to begin the Repair process.
7. Let the Repair run. Setup will now check your disks and then start copying files which can take several minutes.
8. Shortly after the Copying Files stage, you will be required to reboot. (this will happen automatically – you will see a progress bar stating “Your computer will reboot in 15 seconds”
9. During the reboot, do not make the mistake of “pressing any key” to boot from the CD again! Setup will resume automatically with the standard billboard screens and you will notice Installing Windows is highlighted.
10. Keep your eye on the lower left hand side of the screen and when you see the Installing Devices progress bar, press SHIFT + F10. This is the security hole! A command console will now open up giving you the potential for wide access to your system.
11. At the prompt, type NUSRMGR.CPL or compmgmt.msc and press Enter. Voila! You have just gained graphical access to your User Accounts in the Control Panel.
12. Now simply pick the account you need to change and remove or change your password as you prefer. If you want to log on without having to enter your new password, you can type control userpasswords2 at the prompt and choose to log on without being asked for password. After you’ve made your changes close the windows, exit the command box and continue on with the Repair (have your Product key handy).
13. Once the Repair is done, you will be able to log on with your new password (or without a password if you chose not to use one or if you chose not to be asked for a password). Your programs and personalized settings should remain intact.
Thursday, February 5, 2009
Task Kill w/ Batch file
In Windows XP there is a way to automate this using a relatively unknown command called “taskkill”.
Here’s an example of how to use it:
taskkill /im keyclone.exe /f
I chose to use an Adobe Acrobat file in my example but it could be the name of any process that’s currently running.
/im is the image name, which is basically just telling taskkill that you’re about to kill a process by name and what follows is the name of that process.
/f tell is to force the program closed. Don’t ask about it, don’t think about it, close it.
Special thanks to: Danstechnstuff.com
Subscribe to:
Comments (Atom)